 After being asked by Paula over on Ravelry if I could give crew neck instructions for my Baby eyelet cardi pattern, this is what I came up with. (I've made no allowance for buttonholes, as I think I'm just going to add one or two rows of double crochet around all of the edges). Cast on 44 stitches. With stitch markers, separate stitches into 10 for each front, 2 for each sleeve, and 20 for the back. Work in stocking stitch, increasing one stitch either side of the markers on every knit row until you have 22 stitches for each front, 26 for the sleeves, and 44 for the back. The cardi can then be completed the same as the original version :-)
 My other quick bit of knitting this week, was my new i-pod cosy...this really was the quickest project ever, taking just a scrap of 8 ply yarn, a 4mm circular needle, and about half an hour of knitting time :-)
Using the double knitting method, cast on 14 stitches. Knit until your i-pod is nice'n cosy, then remove the stitches from the needle, and reposition them so that you can knit them in the round. After doing 3 or 4 rounds of ribbing, cast off...no seaming or finishing is needed! These new generation i-pods look like they would be heaps easy to scratch, so after declining the advice of the sales guy to purchase an expensive (and ugly) silicone sleeve, we came home and made our own....of course :-D
 ...so here's the way that it usually goes...I see discounted yarn and buy as much as I can afford, or carry, or both!!! (but of course, that's just a given for all yarnies, right?). My next step is usually to take it home, drool over it, plan a million things to make with it, and then put it into storage bins for future use (:-D)...but, this time I was on a mission to use what I bought straight away :-)
 Lincraft had a discount bin next to the check-out with their own brand Blossom for 24 cents a ball (24c!!). By the time that I spotted it, there was a very lonely, sad looking, 3 balls left. A trip back there a couple of days later found another 2 balls :-)
 I didn't know if it would make a full length top, or whether I would have to stop at cropped, but making it top down, meant that I could just keep going until the yarn ran out.
I made it to fit a woman's size 34" at a gauge of 13sts to 22 rows over 4", on size 5mm needles.
BODY
Starting from the top, cast on 42 stitches
Knit 1 rowPurl row, placing stitch markers after stitch 1, 11, 31 and 41Knit row, increasing (knit into front and back of stitch) both sides of the markers
Purl rowContinue the last 2 rows until there are 15 stitches for each front, 38 stitches for each sleeve, and 48 stitches for the back, ending with a purl rowIncrease into 1st stitch, knit to marker, place sleeve stitches on spare needle, knit to next marker, put sleeve stitches onto another spare needle, knit to end, increasing into last stitch (place stitch markers at both underarm seams)Work 8 rows, increasing 1 stitch at both ends of every row
Start to knit in rounds starting at centre front - knit to first marker (use this marker as your beginning of round)
Knit 9 rounds
Knit round, knitting 2 together at each side of markers (decrease round)
Knit 3 roundsDecrease round
Repeat last 4 rounds 4 times more (72 sts)
Knit 15 rounds
Knit round, increasing at each side of markers (increase round)
Knit 3 rounds
Repeat last 4 rounds 4 times
Changing to size 4.5mm needles, knit 1 purl 1 rib for about 12 rounds
Cast off
SLEEVES
Place sleeve stitches back on a size 4.5mm needle and pick up 2 stitches at the underarm (40 sts) place a marker in the middle of the 2 extra stitches
Knit 1 row
Rib 3 rows
Cast off
NECK
Starting at one of the back raglan placements, pick up and knit 102 stitches evenly around neck opening
Rib 3 rowsCast off

Ta-Da!! ... straight from Lincraft to my wardrobe, without having a stop-over at my stash pile...!!
+blue+eyelet+cardi.JPG) After finding out that our new grandbaby-to-be is going to be a boy (can you see this beaming smile on my face?!!), I decided to design and make him this cardi.
After finding out that our new grandbaby-to-be is going to be a boy (can you see this beaming smile on my face?!!), I decided to design and make him this cardi. +eyelet+cardies.JPG) I made the green one first as a test run, and changed what I didn't like about it on the blue...(which was basically just the neckline). This pattern is written for the new and improved blue version :-)2 50g balls of Patons Zhivago Baby
I made the green one first as a test run, and changed what I didn't like about it on the blue...(which was basically just the neckline). This pattern is written for the new and improved blue version :-)2 50g balls of Patons Zhivago Baby
4mm circular needle4 stitch markersGauge: 19sts x 25 rows = 10cm
Size: newborn
K=knit
PM=place marker
Increase=knit into front and back of same stitch
M1=make one stitch by working (K1, yarn forward) at beginning of row, and (yarn forward, K1) at the end of row
Decrease=K2together Starting at neck edge, cast on 26 stitches.
Row 1: K1, PM, K2, PM, K 20, PM, K2, PM, k1
Row 2: Purl
Row 3: Knit row, increasing 1 stitch at each side of markers
Row 4: Purl
Row 5: Knit row, M1 at both ends of row, as well as increasing at each side of markers
Repeat rows 4 and 5 until there are  24 stitches for each front, 26 stitches for each sleeve, and 44 stitches for the back, ending with a purl row.Putting sleeve stitches on a spare needle as you come to them, K24 stitches from 1st front, cast on 3 stitches (for the body underarms), K44 stitches from back,cast on 3 stitches, K24 stitches from 2nd front (98 stitches)Start eyelet pattern:Row 1: Purl
Row 2: K2*Yarn forward K2together K1. Repeat from * to end
 Row 3: PurlRow 4: Knit
Repeat the last 4 rows until there are 8 eyelet pattern repeats, finishing with row 4
Cast off loosely
Turn up at the last eyelet row and stitch to inside, to form the picot edge
Return one set of sleeve stitches to the needle (I worked my sleeves seamless, using a circular needle and the magic loop method, but they could just as easily be worked on double pointed needles, or straight needles and seamed later)
Rejoin yarn and either cast on 4 stitches, or pick them up from the stitches cast on for the body underarms. Place a marker in the middle of these 4 stitches to denote the beginning of the row. (30 stitches)
Working in Stocking Stitch, decrease 1 stitch either side of the marker on every 10th row, 3 times
Work 3 rows
Work 1 row of eyelets (Yarn forward, K2together K1)
Work 2 rows
Cast off loosely
Turn up sleeve at eyelet row and stitch into place on the inside
Work 2nd sleeve to match
Sew on buttons to correspond with eyelet rows. Depending on the baby's size, the cardi can be buttoned using any of the eyelets as buttonholes.
... Love to see piccies if anybody uses the pattern ... :-)
**instructions for a crew neck version of this cardi have been added here**
 Now that I'm back home again after my few weeks in the UK, I've got a mad urge (yep, even madder than usual!) to get into my knitting and sewing :-) My instant gratification came in the form of this apron, which, according to the pattern is supposed to be a top (just thought that my girls would give me absolute heaps if I wore this out in public as a top!!)....hence, it will definately be worn as a pinny. As far as I can tell, the only thing making it a top, is the fact that the skirt part goes all around at the back as well as the front.
 The pattern was one of my op shop
  buys for 20c...a McCalls 2 hour sampler wrap top/dress from 1983. I love the finished look of it (although I did have to put a couple of darts in the top, to prevent a drapey neck), and I love that fact that it did take less than 2 hours :-D
Just a few days before my hols, I had an another awesome find in the op shop (another 20c bargain!). I found a really old, coverless copy of Enid Gilchrist's Play Clothes. I'd never even heard of her before, and was really surprised at how many sewing patterns and information were in one book. Of course, as soon as I got home, I googled Enid's name, and couldn't believe how many things she had published, for both adults and kids. I got straight onto ebay and bid on a whole heap of her books. They were all here at home waiting for me when I returned from overseas....sooo....I had a few days of awesome jetlagged reading :-D When I was searching for info on her, I found this amazing blog called Inspired by Enid. I was really happy to find another Enid fan, and even more so when I realised that the blog belonged to Tracy from Madquilter, one of my favourite crafty bloggers :-D (Tracy, I've got a couple of doubles that I don't think you have..Suits and Dresses 5 to 12 years and the New Idea special publication Baby Book...if you don't already have them, let me know and you're more than welcome to these :-))
I'm not sure yet, what I'll be sewing next, but I'm having great fun trying to decide ;-D
 I know that technically, this is the pattern for the Five Hour Baby Sweater, and although I tried extra hard to knit faster....I just couldn't do it in the five ;-) It's really easy to knit, and I love all of the different variations of it....this one was intended to be the holey yoke version (same as the holes around the bottom). I realised my mistake when I was nearly finished the yoke. Thinking that it looked pretty cute the way that it was, I decided to leave it. To achieve the holes, what I should have done on rows 9, 13, 17, 21, and 25, was to pick up the horizontal loop and knit into the front of it...my knitter's brain told me to knit into the back (for neatness)!!... I'll try the other version next time I knit it, and I should probably make it bigger as well...this one is tiny and by my guess, it should probably fit our new Grandbaby for....oooh, at least a week!! ;-D
I kept track of my progress, so that I could time how long it took....these photos were taken after every hour of knitting....


 These are the specs:Pattern: Five hour baby sweaterYarn: Magnum Soft, one 100g ball of white (I loved this yarn...really soft and springy)
Needles: 4mm circularChanges to pattern: I added 3 buttonholes as per these instructions, and I undid the ribbed cuffs and did 4 rows of garter stitch instead (the garter stitch made the cuffs bigger, and were, I thought, more in keeping with the other garter edges)
I really loved knitting this, and it will definately be my new 'go to' quick baby pressie knitting pattern :-)
......ok, so this blog title was supposed to be sung like this! ... aaahhh, Slade in the early 70's ... how cool is that ;-D....it has, however, got nothing to do with this blog post, other than the fact that I had the urge to sing Baby, baby, baby!, Noddy Holder style at the top of my voice :-D
The reason why?......OMG,we're going to be Grandparents! (once again, insert said song here!!!)....if vividly remembering early 70's glam rock didn't age me, then the grandma bit sure did :-)
 I started knitting already.... I couldn't help myself! I used this free pattern for the white one, and the Simple Baby Cap #2 from Itty Bitty Hats for the yellow. I used an unknown 8 ply for the first one (the ball band was missing), and Shepherd Cuddles4Me for the other (I love this yarn...it has a really nice squishy feel to it). I had a second trip to Big W to buy some more for a matching jacket...can't wait to start it :-)
Tracy, thank you so much for the blog award!...I'm really happy that you read my blog :-D
(Sorry that it took me so long to reply!)
 ...another pair of easy, easy socks :-) They really are just a magic looped tube with a bit of tweaking on the toe and heel
Yarn: Just over one ball of Panda Zoomy (I used 115g)
Gauge: 12st x 19rows = 10cm on size 7mm needles
Using the Turkish Cast On, make 8 wraps of the needle (16 stitches in total, 8 for each side), then increase each side, every other round, until there are 14 stitches on each side. Continue knitting without shaping for about 20 rows, and then work half of the stitches on waste yarn for an Afterthought heel.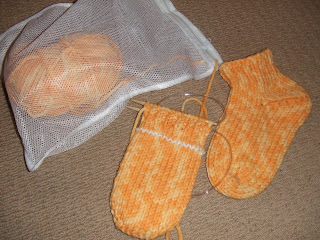 Finish the sock with a couple of rounds of stocking stitch and some ribbing before returning to the heel. Pick up the 28 stitches, and a couple of extra stitches each side to eliminate any holey bits, and decrease each side, every other round until there are 15 left....then it's just casting off the remaining stitches using the 3 Needle Bind Off.
These socks are great for wearing around the house in the winter ... warm, cozy, soft ... and they let you do an awesome Tom Cruise Risky Business style slide across the hardwood floor ...
not that I would do anything that silly of course ;-D
... although, I've 'heard' that it IS a great way to dust!
 Finally....I have a knitting FO to show :-) (and just in time for Adelaide's cold snap!)
This was a jumper that I started in December after buying a bag of grey yarn from the Op Shop....it was just a mixed bag of assorted yarns in different weights and textures, that only cost a few dollars.
With knitting it top-down (thanks as always to Barbara Walker's 'Knitting from the Top'), I was able to knit each stripe until the yarn ran out. The first one I used was Patons Cottage Knit, which was a chunky, slubby mix - this determined the gauge (very roughly!), and the needle size. With the rest, I then just doubled or tripled them to give a similar gauge. I added some shaping through the waist, with 4 darts, and by using a slightly thinner yarn.
 The neckline had a 'roll' happening that would have been annoying to wear, so I just crocheted a row of htr's around the top to pull it flat...it still needs blocking to help it to sit better, but hey...that can wait until the jumper needs washing ;-D
....and of course, as ever!...for every one FO, there are one or two!!! UFO's waiting in the wings....;-D

 ...so...not a lot of blogging has been happening these last few weeks due to my rapidly failing camera...but I'm back, armed and ready with my new Fuji Finepix Z5, which (oh yeah!) has a blog ready photo setting :-) What to photograph first?...aaah my new book goodies :-D
I took a trip to Dymocks to see what new craft books they had...just browsing you understand ;-D (apart from these two, which just looked too good not to buy!).
To be honest, the Sew What! Fleece book wouldn't usually have gotten a look, but because it was in the same format as the Sew What! Skirts book, and knowing how awesome that book is, I flicked through it. If you look past the fact that everything is made of fleece (!!), there are some really nice, basic patterns (like the skirt book, they are based on your own measurements and marked directly onto the fabric). I was hoping that there would be a pants, tops, sleepwear edition in the Sew What books, but really, this book has a pattern for all of them :-)
now...off to find some pants fabric...more piccies to follow
 ....how exciting :-DAfter months of reading my copy of Knitting from the Top, I decided to have a go at a jumper with set in sleeves ... I usually shy away from the 'set ins' as the shoulder seams tend to bug me a bit...but according to Barbara Walker this method should produce "a smooth, unbroken band of knitting over each shoulder, which slopes diagonally downward from neck to arm, as a well shaped shoulder should, yet shows no interruption of the fabric anywhere". Well..I tried it! and yes, I gotta say that I'm pretty impressed :-) Thanks Barbara!
I used some of my $5 Wangaratta yarn from Lincraft in a slightly slubby 8 ply, with different coloured flecks in it. I thought this would help disguise any mishaps with my short row shaping, if needed (glad to say that they looked pretty good!)
Next onto the armholes! (I'm doing the body first method from the book, but I'm looking forward to trying the simultaneous set in sleeves next time)...Why is my head is always jumping forward to the next project!!!?
 After being asked by Paula over on Ravelry if I could give crew neck instructions for my Baby eyelet cardi pattern, this is what I came up with. (I've made no allowance for buttonholes, as I think I'm just going to add one or two rows of double crochet around all of the edges). Cast on 44 stitches. With stitch markers, separate stitches into 10 for each front, 2 for each sleeve, and 20 for the back. Work in stocking stitch, increasing one stitch either side of the markers on every knit row until you have 22 stitches for each front, 26 for the sleeves, and 44 for the back. The cardi can then be completed the same as the original version :-)
 heaps easy to scratch, so after declining the advice of the sales guy to purchase an expensive (and ugly) silicone sleeve, we came home and made our own....of course :-D


+blue+eyelet+cardi.JPG)
+eyelet+cardies.JPG)


